Introduction
For a hobbyist CO2 monitoring project, there are three main components:
CO2 Sensor
Microcontroller
Power Supply
For the CO2 sensor, there are several different types, From my understanding, the most accurate sensor available is the NDIR (Non-dispersive Infra Red) sensor. So for the purposes of this project, this is the sensor I intend to use. There are also estimated CO2 sensors available at a much lower cost, but they are far less accurate. To get readings from the sensor, most sensors are serial based. They use one or two data lines to send a receive data, as opposed to say, generating a voltage or current output proportional to the signal being measured. The two most common serial protocols are SPI and I2C. There are differences between the two protocols, the main advantage of I2C is that sensors can all be grouped together on a single communication bus. In this project the sensor I will use is I2C based. The sensor I have selected is the Sensirion SCD30 and the data sheet here. Accuracy is 30ppm +/- 3%, comes fully calibrated, and has lifetime drift of +/-50ppm, and its $90 CAD.
For the microcontroller, there are lots of options to choose from. I think the two most common ones are Raspberry Pi and Arduino. I think the Arduino is a little easier to use for beginners, there is no real OS to deal with, you write your code in their IDE (Integrated Development Environment) and download the code into the micro. The Rapberry PI runs on linux, those familiar with linux, may prefer to use a Raspberry PI. For the purposes of this project, I am going to use an Arduino Yun, as I have one on hand. A number of years back I used this controller to make a temperature and humidity datalogger to check the temperature and humidity in my attic. I chose the controller because it was the first wifi based Arduino available, so I’d be able to get the temperature from the controller while it sat in my attic. It also had an SD card, which I used to log all measurements.
Last part needed is a power supply. The Arduino and Rasperry Pi both run off USB power so there are plenty of cheap AC adapters and batteries available that can be used for this purpose. Pretty much and portable battery that is design to charge a phone, can be used.
Potentially, one may also want a small project box to put this in.
As for the build, I’ve been trying to think if this project could be done without soldering. Looking at the parts, I think there will be a couple places where you will need to make a solder joint. With the use of bread boards and jumpers you can do a lot without soldering, but the sensor itself does not have a connector or header, so at a minimum, this will need to be soldered. Many of the other connections could make use of a bread board and jumpers. Here, my daughter is working with an Arduino Uno from the Sparkfun Inventors kit a number of years ago

For this project, like I mentioned earlier I will use the Arduino Yun, which looks like this

In my previous project, instead of a breadboard, I used a breakout board designed to plug into the Yun. This is really only needed as the sensors work at 3.3V, while the Yun works 5V, so there is a need to level convert the data lines from 5V to 3V to talk to the sensors. There are microcontrollers that have ports that work at 3V, at the time I bought the Yun, to get the Wifi feature, the controller board was 5V based.

Above is the breakout board that plugs into the Yun. This is just like the breadboard, but instead of wire jumpers you can push in, this requires solder connections. In the middle of the breadboard is a small board which is doing the level conversion.

Above is the full assembly, not very pretty, but it works. The bottom right corner is the temperature and humidity sensor and in the middle is a 7 segment display that alternates between showing the temperature and the humidity. The temperature sensor is on long wires, because i found that heat generated by the Yun, would conduct into the breakout board and cause the temperature to read several degrees high. The high temperature reading would in turn affect the relative humidity being reported.

So, I should be able to remove the existing temperature and humidity sensor, and replace it with the Sensirion sensor, which will give me temperature, humidity, and CO2.
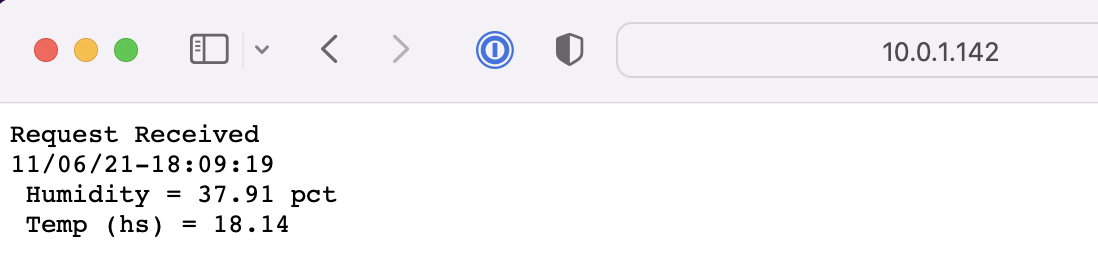
With the Yun being wifi enabled and running a webserver, I can get the current readings from any broswer while I am at home. Back in the day, I set my router to forward a port to this webserver so I could check readings while out of the house . Not a good idea. Better option is to VPN home and check the sensor that way.
Summary:
Parts
So, it looks like the Yun is obsolete. I’ll have to find another microcontroller board to recommend, but looks like there are still a few here at Amazon. I should also be able to find a Canadian source for the parts to save on shipping and duties. Mouser for example sells the sensor as well, but may be getting it from Sparkfun, hence the added shipping time.
The Sparkfun Openlog Artemis also looks very interesting. Potentially you could just take the CO2 sensor, the Artemis, and a battery and you’d have a datalogger (without a display) that you could throw in a bag or backpack to record reading through the day. You’d have to grab the data of the SD card to get your readings.