CO2 and Particulate Matter Datalogger


The above project uses the Sparkfun Qwiic system to reduce the amount of soldering. The only component that does not have a qwiic connector is the particulate sensor. The particulate sensor (SEN54) does come with a cable assembly that can plug directly into the red board. It works out well this way because the SEN54 needs 5V but the qwiic bus is 3.3v.

I chose the artemis red board because I knew I needed more memory than the ATMega boards provided. I had a setup without the larger LCD display and the SEN54 and it was using 94% of the ATMega memory.

There are a couple things hat can trip you up. Most notable, every module comes with pull-up resistors on the I2C lines. You only need one set and with too many resistors, the communications will stop working properly. Check the board documentation, there are some traces that are easily cut to remove the pull-up resistors from the circuit. I also had to slow down the communication speed to the red board to get it to successfully program.

The library for the OLED display is for a wide range of displays. The documentation can be a little confusing. The proper configuration for the display is:

U8G2_SSD1327_EA_W128128_F_HW_I2C u8g2(U8G2_R0, /* reset=*/ U8X8_PIN_NONE); /* Uno: A4=SDA, A5=SCL, add "u8g2.setBusClock(400000);" into setup() for speedup if possible */

Parts List

SCD41

https://www.sparkfun.com/products/18366

SEN54

https://www.sparkfun.com/products/19325

OLED Display

https://www.sparkfun.com/products/15890

Battery Holder

https://www.sparkfun.com/products/9835 

QWIIC Cable

https://www.sparkfun.com/products/17259 

Red-board Artemis

https://www.sparkfun.com/products/15444

RTC

https://www.sparkfun.com/products/16281

Openlog

https://www.sparkfun.com/products/15164 

Final Build

Here is the final build.

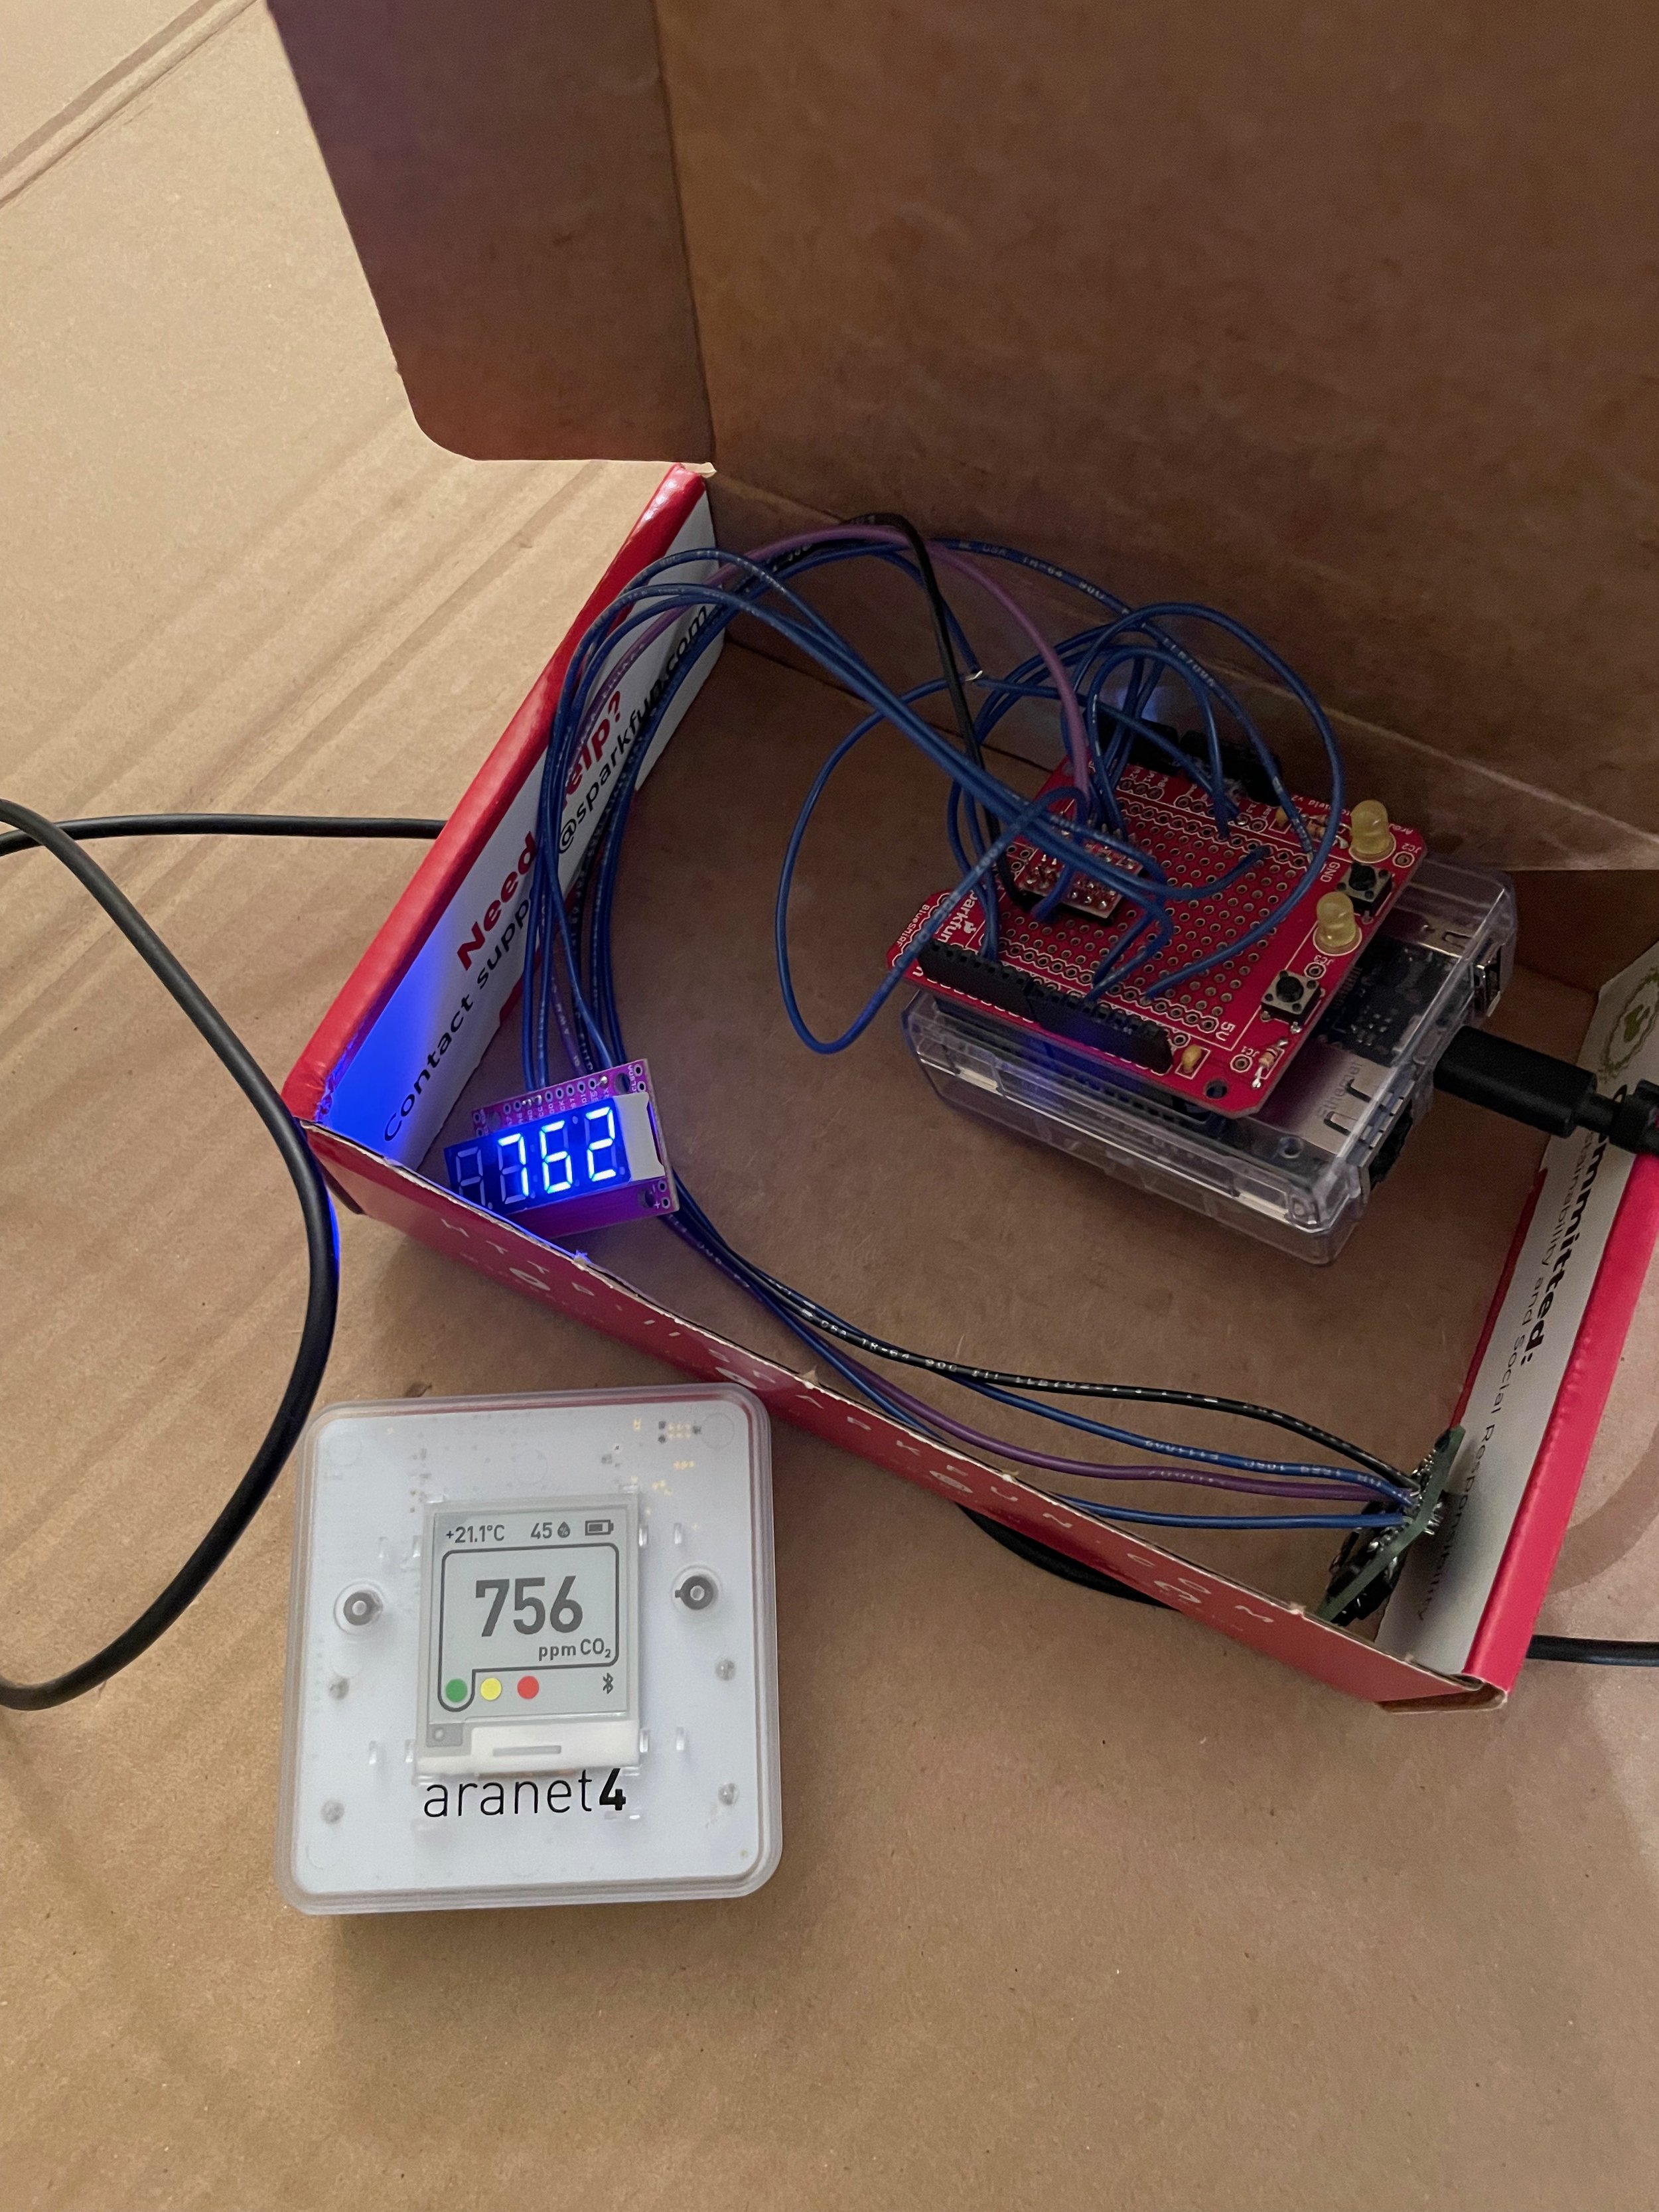
The main components are an Arduino Yun (obsolete, but replacement is Arduino Uno Wifi), a Sensirion SCD30 NDIR CO2 sensor, a 7 segment display and a battery. The Adruino is powered by USB, so any phone wall charger or battery charger will suffice.

Features

  • Can measure CO2 (+/-30ppm + 3% Measured Value), temperature and humidity

  • Display shows and cycles through CO2, and temperature

  • Built in webserver, so can get reading via webpage while on same wifi network

  • Built in webserver also used to trigger outdoor calibration

  • Logging data to built in SD Card

  • Time stamp for logging available as webserver pulls time from internet

I don’t have access to any lab based (ie calibrated) instruments to verify the accuracy of the unit, so I have been using the Aranet4 for comparison, as many experts recommend this unit. As you’ll see in the chart below, readings of the Aranet4 and the Arduino SCD30 correlate highly. With combination of the Sensirion data sheet and seeing various clients who manufacture medical devices use Sensirion sensors in their products, I think this sensor is of reasonably good quality.

For simplicity I have just found a sturdy cardboard box, cut some holes, put in some filter material. One could do better with a project box from a local electronics hobby shop, like Sayal, in the Toronto area. This setup is probably fine-ish. Some risk of ESD damage to the components. For me, this will probably just end up sitting on my desk at work.

Below you will also find a hand drawn schematic of the device. There is not a lot to it, but there is some soldering involved. The sensor I2C comms work at 3.3V but the Arduino works at 5V, so I have a bi-directional level shifter in the circuit. You can also get away with some resistors. I used the Arduino proto shield to tidy up the wiring and the soldering and make it so I can easily disconnect the Arduino.

A note on automatic background calibration. All of the CO2 sensors I have seen, have the ability to do automatic background calibration. Some also have the ability to turn it off, and all have different defaults, some ship with it on and some with it off. I have one device that does not allow you to turn off automatic background calibration. I think my preference is to leave it off. In the code below, when I initialize the SCD30, I disable it. The Aranet4 ships with it off. The Awair Element has it enabled and does not allow you to turn it off. It is very rare for my house to hit 400ppm, and what I find is that if the sensor does not periodically see fresh air, it assumes the lowest reading seen over the previous interval as 400ppm. The result is that over time, the sensor reads artificially low as it calibrates in this high baseline level. Having the Aranet4 for some time and brining it into fresh air, I can tell that it does not drift very quickly. Maybe a workplace or school where the building is unoccupied for 8-12 hours at a time might get back to fresh air levels? Your mileage may vary.

There are other alternate builds you could do. The simplest build is to use a sensor, a micro and a display. To add logging, you’ll need both and SD card and something to give you time, either a realtime clock module, and a means to program the time. The Uno Wifi is nice, because it can grab the time off a timeserver on the internet.

There are plenty of SCD30 sensors available, at the time of writing this on Nov 14, 2021, Digikey has 25,406 sensors. Looking at the Sensiron home page, they no longer list the SCD30 sensor (SCD3x) but have moved on to SCD4x series sensors. Its a different technology, but the specs are almost as good, but they advertise as more cost effect. They do seem to be 25% cheaper while going from +/-30 of the SCD30 to +/- 40 or +/- 50 of the SCD4x sensor, depending on the model. The availability of the SCD4x sensors is a little more sparse. Sparkfun has one of the sensor variants on its Spark X product page.

Conclusion:

The gold standard is the Aranet4, which is accurate and very easy to carry with you. With a little bit of work, I think an enthusiastic hobbyist, could make something that is very comparable in accuracy, it just won’t be quite as polished or pocketable, but it will be a little cheaper. Cost will vary by the features implemented, but for something that gives you a sensor and a display, you could probably make something in the price range of $150 CAD. For me, I think I am going to take this box and leave it at my desk at work.

Further Reading:

Solder free options here.

Appendix

BOM

Image below is the unit as built, with the box open

The image below is 12 hours of readings from the Aranet4 and the Arduino SCD30 unit where the two are sitting next to each other.

Image below is what you see when you visit the IP address of the Arduino with a browser.

Below is hand drawn schematic of how the unit is wired.

Below is the code programmed into the Arduino

#include <SparkFun_SCD30_Arduino_Library.h>


#include <Wire.h> //I2C needed for sensors
#include <FileIO.h> 
#include <Bridge.h>
#include <YunServer.h>
#include <YunClient.h>
#include <SoftwareSerial.h>

SCD30 airSensor;

//SCD30 Sensor is connected to D2 & D3 for I2C use.
//Bi-level logic converter used to convert the Yun 5V logic level to 3.3V for SCD30

//The 7 segment display is connected to D9 for serial control
const int softwareTx = 9;
const int softwareRx = 8;

SoftwareSerial s7s(softwareRx, softwareTx);


//Set up global variables to store readings
//Continuouslu update the globals on every loop when data is available
float humidity = 0; // [%]
float temperature = 0; // [temperature C]
uint16_t CO2Level = 0;

//These are used to either log or switch (Blink) the display at a fixed interval
unsigned long previousMillisLog;
unsigned long previousMillisBlink;

bool firstPass = true;
bool showTemp = true;

YunServer server;

//Setup gets called once on load
void setup()
{

  Bridge.begin();  //Setup link between linux side and arduino side
  Serial.begin(9600);  //Configure serial port
  FileSystem.begin();  // Setup the file system on the linux side
  Wire.begin();  //Startup the I2C comms

  airSensor.begin(Wire,false);  //startup the SCD30 but disable auto background cal.  It wants to see fresh air for 1hr every day
  
  
  s7s.begin(9600);  //Startup 7 segment display

  Serial.println("Temperature Monitor online!");
  
  server.listenOnLocalhost();  //Have the webserver start listening to requests
  server.begin();


  File dataFile = FileSystem.open("/mnt/sd/datalog.txt", FILE_APPEND);

  delay(2000);

  // if the file is available, write to it:
  if (dataFile) {
    dataFile.println("Logging Begins");
    dataFile.close();

  }
  
  previousMillisLog = millis();
  previousMillisBlink = millis();
  logMeasurements();
  
  clearDisplay();  // Clears display, resets cursor
  //s7s.print("-HI-");  // Displays -HI- on all digits
  //setDecimals(0b111111);  // Turn on all decimals, colon, apos


}

void loop()
{
  char tempString[10]; 
  int tempf;
  
  // Get clients coming from server
  YunClient client = server.accept();

  // There is a new client?
  if (client) {
    // Process request
    process(client);

    // Close connection and free resources.
    client.stop();
  }
  
  if (firstPass == true)
  {
    firstPass = false;
    File dataFile = FileSystem.open("/mnt/sd/datalog.txt", FILE_APPEND);

    //delay(2000);

    // if the file is available, write to it:
    if (dataFile) {
      dataFile.println("Logging Begins");
      dataFile.close();
    }
  }
  
  //Every 30 Seconds log to file
  if(millis() - previousMillisLog > 30000)
  {
    previousMillisLog = millis();
    logMeasurements();
  }

  //Every 5 seconds update display
  if(millis() - previousMillisBlink > 5000)
  {
    previousMillisBlink = millis();
    if (showTemp)
    {
      showTemp = false; //Next time show CO2
      tempf = (temperature)*10;  //Doing this to show decimal plave on display
      sprintf(tempString, "%4d", tempf);
      s7s.print(tempString);
      setDecimals(0b00000100);
    }
    else 
    {
      showTemp = true;  //Next time show temperature
      tempf = CO2Level;
      sprintf(tempString, "%4d", tempf);
      s7s.print(tempString);
      setDecimals(0b00000000);
    }
  }
  if (airSensor.dataAvailable())
  {
    CO2Level = airSensor.getCO2();
    temperature = airSensor.getTemperature();
    humidity = airSensor.getHumidity();
  }
  delay(50);

}


void process(YunClient client) {
  // read the command
  String command = client.readStringUntil('/');

  Serial.println(command);

  if (command.startsWith("temp")) 


  if (command.startsWith("cal")) 


}

void tempCommand(YunClient client) {
  String dataString;
  float voltage, degreesC, degreesF;
  dataString += getTimeStamp();
  dataString += "\n Humidity = ";
  
  Serial.println("Hello!");

  client.println("Request Received");


  dataString += humidity;
  dataString += " pct \n Temp = ";
  dataString += (temperature);

  dataString += " \n CO2 = ";
  dataString += CO2Level;
  dataString += " ppm";

  // Send feedback to client
  client.println(dataString);

 
}

void calCommand(YunClient client) {
  String dataString;
  float voltage, degreesC, degreesF;
  dataString += getTimeStamp();
  dataString += "\n Calibrated ";
  airSensor.setForcedRecalibrationFactor(400);
  

  client.println("Request Received");

  // Send feedback to client
  client.println(dataString);

}


String getTimeStamp() {
  String result;
  Process time;
  // date is a command line utility to get the date and the time 
  // in different formats depending on the additional parameter 
  time.begin("date");
  time.addParameter("+%D-%T");  // parameters: D for the complete date mm/dd/yy
                                //             T for the time hh:mm:ss    
  time.run();  // run the command

  // read the output of the command
  while(time.available()>0) {
    char c = time.read();
    if(c != '\n')
      result += c;
  }

  return result;
}


//Prints the various variables directly to the port
//I don't like the way this function is written but Arduino doesn't support floats under sprintf
void logMeasurements()
{
  String dataString;
  //float voltage, degreesC, degreesF;
  dataString += getTimeStamp();
  dataString += ",";
  

  dataString += humidity;
  dataString += ",";
  dataString += temperature;
  dataString += ",";
  dataString += CO2Level;

  File dataFile = FileSystem.open("/mnt/sd/datalog.txt", FILE_APPEND);

  // if the file is available, write to it:
  if (dataFile) {
    dataFile.println(dataString);
    dataFile.close();

  }  
  // if the file isn't open, pop up an error:
  else {
    Serial.println("error opening datalog.txt");
  } 
  
  
}

void clearDisplay()
{
  s7s.write(0x76);  // Clear display command
}

void setDecimals(byte decimals)
{
  s7s.write(0x77);
  s7s.write(decimals);
}


Solder Free Options

If you are interested in making your own CO2 sensor, and don’t want to do any soldering there are options. For the solder free option, I’d recommend the Sparkfun Qwiic line.

With the options below and a USB 5V power source you will have a functioning CO2 sensor with display (No logging). To get logging, there are options to add a QWIIC based microSD card along with a QWIIC based RTC board (which you will need to set and keep time for your log).

Option 1: Simplest, Cheapest (But Least Accurate)

Option 2: More accurate, but still solder free

The Sensiron seems to be replacing the NDIR sensor with the photoacoustic version, as it is lower cost and only slightly less accurate +/- 50ppm vs +/- 30 ppm. I should note that the eCO2 sensors I have found do not publish specs on CO2 accuracy, which speaks volumes.

All prices and link above in USD, and will end up with shipping and duties charges. Mouser.ca also stocks some Sparkfun boards.

The SD40x sensor seems to be in short supply. The SCD30 sensor can also be used. It would require a small amount of soldering.

Up and Running

I have the Sensirion SCD30 sensor connected up to my Arduino Yun, so just a quick update.

Below you’ll find a quick hand sketch showing the connection to hook up the sensor. In the the middle the “BOB-12009” handles the level translation from the Arduino DIO 5V signal level to the 3.3V signal level of the CO2 Sensor.

The sensors are reading within a few counts of each other. I did an outdoor calibration on the SCD30 last night, and I turned off automatic background calibration. Reading the doc, for the automatic background calibration to work, it wants to see fresh air for 1hr once a day. I don’t think it will ever see that.

#include <SparkFun_SCD30_Arduino_Library.h>


#include <Wire.h> //I2C needed for sensors
#include <FileIO.h> 
#include <Bridge.h>
#include <YunServer.h>
#include <YunClient.h>
#include <SoftwareSerial.h>

SCD30 airSensor;

//SCD30 Sensor is connected to D2 & D3 for I2C use.
//Bi-level logic converter used to convert the Yun 5V logic level to 3.3V for SCD30

//The 7 segment display is connected to D9 for serial control
const int softwareTx = 9;
const int softwareRx = 8;

SoftwareSerial s7s(softwareRx, softwareTx);


//Set up global variables to store readings
//Continuouslu update the globals on every loop when data is available
float humidity = 0; // [%]
float temperature = 0; // [temperature C]
uint16_t CO2Level = 0;

//These are used to either log or switch (Blink) the display at a fixed interval
unsigned long previousMillisLog;
unsigned long previousMillisBlink;

bool firstPass = true;
bool showTemp = true;

YunServer server;

//Setup gets called once on load
void setup()
{

  Bridge.begin();  //Setup link between linux side and arduino side
  Serial.begin(9600);  //Configure serial port
  FileSystem.begin();  // Setup the file system on the linux side
  Wire.begin();  //Startup the I2C comms

  airSensor.begin(Wire,false);  //startup the SCD30 but disable auto background cal.  It wants to see fresh air for 1hr every day
  
  
  s7s.begin(9600);  //Startup 7 segment display

  Serial.println("Temperature Monitor online!");
  
  server.listenOnLocalhost();  //Have the webserver start listening to requests
  server.begin();


  File dataFile = FileSystem.open("/mnt/sd/datalog.txt", FILE_APPEND);

  delay(2000);

  // if the file is available, write to it:
  if (dataFile) {
    dataFile.println("Logging Begins");
    dataFile.close();

  }
  
  previousMillisLog = millis();
  previousMillisBlink = millis();
  logMeasurements();
  
  clearDisplay();  // Clears display, resets cursor
  //s7s.print("-HI-");  // Displays -HI- on all digits
  //setDecimals(0b111111);  // Turn on all decimals, colon, apos


}

void loop()
{
  char tempString[10]; 
  int tempf;
  
  // Get clients coming from server
  YunClient client = server.accept();

  // There is a new client?
  if (client) {
    // Process request
    process(client);

    // Close connection and free resources.
    client.stop();
  }
  
  if (firstPass == true)
  {
    firstPass = false;
    File dataFile = FileSystem.open("/mnt/sd/datalog.txt", FILE_APPEND);

    //delay(2000);

    // if the file is available, write to it:
    if (dataFile) {
      dataFile.println("Logging Begins");
      dataFile.close();
    }
  }
  
  //Every 30 Seconds log to file
  if(millis() - previousMillisLog > 30000)
  {
    previousMillisLog = millis();
    logMeasurements();
  }

  //Every 5 seconds update display
  if(millis() - previousMillisBlink > 5000)
  {
    previousMillisBlink = millis();
    if (showTemp)
    {
      showTemp = false; //Next time show CO2
      tempf = (temperature)*10;  //Doing this to show decimal plave on display
      sprintf(tempString, "%4d", tempf);
      s7s.print(tempString);
      setDecimals(0b00000100);
    }
    else 
    {
      showTemp = true;  //Next time show temperature
      tempf = CO2Level;
      sprintf(tempString, "%4d", tempf);
      s7s.print(tempString);
      setDecimals(0b00000000);
    }
  }
  if (airSensor.dataAvailable())
  {
    CO2Level = airSensor.getCO2();
    temperature = airSensor.getTemperature();
    humidity = airSensor.getHumidity();
  }
  delay(50);

}


void process(YunClient client) {
  // read the command
  String command = client.readStringUntil('/');

  Serial.println(command);

  if (command.startsWith("temp")) 


  if (command.startsWith("cal")) 


}

void tempCommand(YunClient client) {
  String dataString;
  float voltage, degreesC, degreesF;
  dataString += getTimeStamp();
  dataString += "\n Humidity = ";
  
  Serial.println("Hello!");

  client.println("Request Received");


  dataString += humidity;
  dataString += " pct \n Temp = ";
  dataString += (temperature);

  dataString += " \n CO2 = ";
  dataString += CO2Level;
  dataString += " ppm";

  // Send feedback to client
  client.println(dataString);

 
}

void calCommand(YunClient client) {
  String dataString;
  float voltage, degreesC, degreesF;
  dataString += getTimeStamp();
  dataString += "\n Calibrated ";
  airSensor.setForcedRecalibrationFactor(400);
  

  client.println("Request Received");

  // Send feedback to client
  client.println(dataString);

}


String getTimeStamp() {
  String result;
  Process time;
  // date is a command line utility to get the date and the time 
  // in different formats depending on the additional parameter 
  time.begin("date");
  time.addParameter("+%D-%T");  // parameters: D for the complete date mm/dd/yy
                                //             T for the time hh:mm:ss    
  time.run();  // run the command

  // read the output of the command
  while(time.available()>0) {
    char c = time.read();
    if(c != '\n')
      result += c;
  }

  return result;
}


//Prints the various variables directly to the port
//I don't like the way this function is written but Arduino doesn't support floats under sprintf
void logMeasurements()
{
  String dataString;
  //float voltage, degreesC, degreesF;
  dataString += getTimeStamp();
  dataString += ",";
  

  dataString += humidity;
  dataString += ",";
  dataString += temperature;
  dataString += ",";
  dataString += CO2Level;

  File dataFile = FileSystem.open("/mnt/sd/datalog.txt", FILE_APPEND);

  // if the file is available, write to it:
  if (dataFile) {
    dataFile.println(dataString);
    dataFile.close();

  }  
  // if the file isn't open, pop up an error:
  else {
    Serial.println("error opening datalog.txt");
  } 
  
  
}

void clearDisplay()
{
  s7s.write(0x76);  // Clear display command
}

void setDecimals(byte decimals)
{
  s7s.write(0x77);
  s7s.write(decimals);
}